
Rethinking Your Key Art Game Plan, Part 2
Guest blogger is The Film Collaborative’s Creative Director, David Averbach, who has worked with dozens of TFC Clients and other filmmakers to help them create and refine their key art. See Part I HERE
Note: This Key Art series is intended for micro-budget filmmakers whose crew is not under a union contract. If your film’s crew is under an IATSE contract, you will need to abide by the rules regarding still photographers on set as forth by the union. We have been advised that there may be penalties involved by bringing an intern or PA in to shoot stills.
Last week, in Part 1 of this blog series, I discussed how relying solely on 1920×1080 pixel frame grabs was a bad idea if one wanted to create a poster that featured some sort of main image. In an ideal world, your entire film would be shot on a 5K camera, and you could pull as many frames from the footage as you wanted. That would be Plan A. But in the real world, many filmmakers emerge from their shoots with only 1080p frame grabs, and that’s not going to work.
Another problem is about marketing. During the chaos of a film shoot, filmmakers often forget to think about the art they might need to support a variety of possible marketing ideas and concepts, and are therefore left with fewer choices and placed in an ultimately weaker position vis à vis possible options on how to market their film without an expensive and inconvenient reshoot.
This blog series offers some concrete advice on how you can protect your film’s marketing future by adding a few inexpensive steps to your key art game plan.
A photographer on the set with a second 5K camera is great if you can afford it. That would be Plan B. But if your budget is limited (or even if it isn’t), last week I suggested a third plan—a “Plan C”—that as far as I’m concerned should be executed whether your film is entirely being shot on a 5K camera or whether there is a professional photographer on set or not. I’m sure I made some of you cringe by suggesting that you pick up a cheap but powerful point-and-shoot camera and putting an intern or production assistant in charge of shooting “hi-res scraps”—basically a lot of shots of the characters in various poses during the down time on a film shoot—that can be utilized down the line by a designer to execute the envisioned poster. The bottom line is this: as a designer myself, I’d rather have the opportunity to work with shots taken from a cheap but decent camera than nothing at all.
One of the reasons I suggested this is that while professional photographers undoubtedly bring a great deal of talent to a set, their exact skill set may not be entirely conducive to producing key art elements. A photographer’s eye for composition usually relies on what they see in bounds of their view-finder, and having them do some of the things that I’m going suggest here in Part 2 of this key art blog series may cause a bit of pushback and confusion. It’s best to let them do what they usually do and concurrently (i.e. Plan C) have a go with the point-and-shoot/intern thing. Of course you don’t have to use a point-and-shoot camera if you have a better one available. But I work with a lot of filmmakers whom I feel would find an excuse not to do this if there were more work/more cost involved. And if you use an intern or a production assistant, or perhaps a rotate through a handful of them, you’re giving them something real to do, which will inspire them to do a better job in everything they are their to do for you. It’s a win-win. Have them take as many photos as they can. Just make sure you buy some extra high capacity compact flash cards.
Now onto Part 2…
You may have an idea of what you want your poster to look like even before you begin your film shoot. Great. But don’t plan for that to be the only idea you execute. You should produce the photos necessary to execute MANY ideas. Here are some possible concepts.
Have a discussion about marketing before your shoot and come up with two dozen ideas. They don’t have to be all that specific. If your film involves one main character, or a pair of characters, then let’s assume for the moment that you could feature them in some way in terms of poster real estate…Accordingly, my first example will be to think a bit about how you could execute a concept that features a single image that takes up the entire poster. Again, you decide what that single image should be…perhaps it’s your main character. Perhaps it’s two characters. Perhaps it’s something else. But here’s the takeaway: at this stage, don’t produce a shot. Produce ELEMENTS.
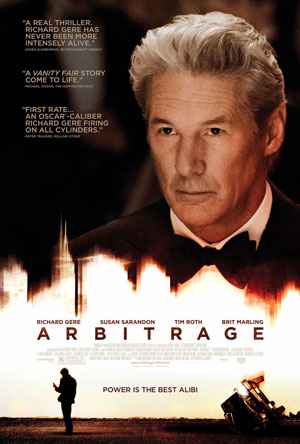
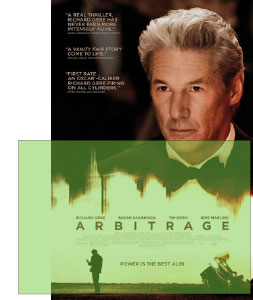
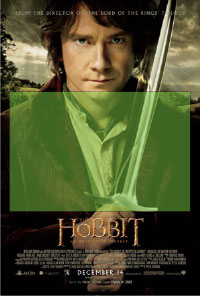
Let’s have a look at a few posters from current movies that involve a single shot. If these movies aren’t your taste, it doesn’t really matter…the concepts can be applied to almost anything or any style of poster.
 |
 |
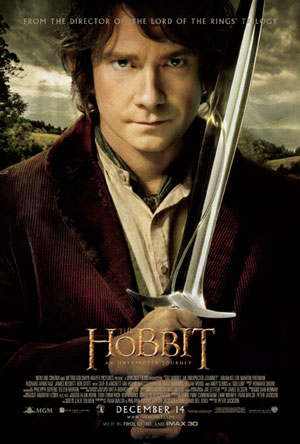 |
Looking at these posters closely in as full a resolution as I could find online, they have one thing in common: each image of the actor is a cutout placed in front of a different background from which the shot was taken. Artbitrage is the most blown-up…if you walk up to this poster in a theater and had a close look, I suspect, you’d see quite a bit of distortion. In The Hobbit, they’ve added a bit of noise to mask the upresing and blend it in with the colors of the bucolic background scene, but I suspect the picture was a much higher res to begin with. Gatsby remains the clearest photo, and the crispness works well with the art deco concept. A designer could create any of these looks with a photo of like the one of Leo DiCaprio, but it would be hard to create a Gatsby-like effect with the photo of Richard Gere.
In the absence of a large format camera in a studio environment, to get as full a resolution as possible, here’s what I suggest, and I know this is a bit unorthodox, but it’s pretty straightforward. Set up a white sheet as a background, or if your subject has a lot of fly-away hair, you may want to try it with a green or blue screen. (I found a cheap one here.) This will allow the designer to take away the background to produce a cutout. This is really no big deal for a graphic designer, unless there is a ton of hair involved, in which case, be sure to try it with a number of different backgrounds. This isn’t a shampoo ad, so shaving off a little hair is forgivable in this arena.
First, take a normal full body shot in portrait orientation just so there is at least one shot of the entire scene you are trying to capture.
But this shot will not be the one that is used. Instead, break the photo up into several shots…the trick is not to hold the camera in portrait orientation but keep it in landscape while you do this…then later on your designer reassemble them into a unified whole.
Why do it this way? Last week, I showed you what you can expect to achieve with a 16.1 megapixel camera:
![]()
Doing it this way will give you the most resolution to work with…
You may need to do it a few times to insure consistency in terms of lighting etc., but with the magic of photoshop, this shouldn’t be much of an issue. You’d want to be careful not to break the shot in the middle of any complicated parts, such as the person’s eyes or mouth, for example.
Start with the person’s face…make sure not to cut off the top of the head (even though two of heads in the posters here are cropped)…
 |
 |
 |
Then quickly lower the camera vertically and take another shot, so that the second overlaps just a bit, to get the upper part of the torso.
 |
 |
 |
Make sure to take dozens of shots like these, so that you have enough photographs to mix and match, as sometimes the pictures can vary in terms of lighting, or your hand is not in the exact position, etc. If there is a prop involved, I would not have that in the shot, but just have them grip something similar and photoshop the item (like a sword) back in later. (Remember to also take pictures of the prop using this technique.)
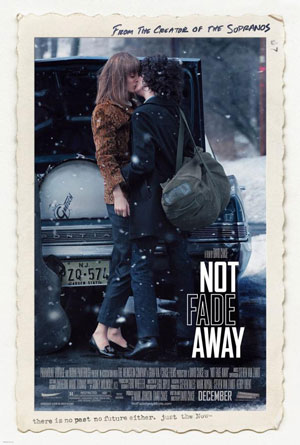
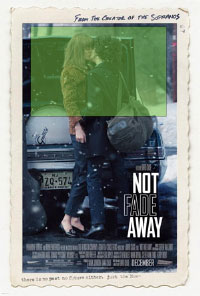
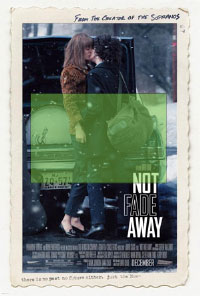
Perhaps you don’t want to feature just one character…after all, your film may not involve such a recognizable star as Richard or Leonardo. Let’s say you really want a particular shot of two of your main characters in some sort of pose. Like in the following film, Not Fade Away.
 |
 |
 |
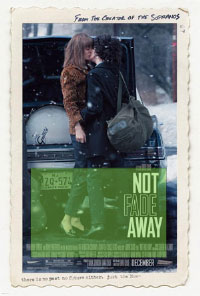 |
It is a bit counter-intuiative, but what I would do here is photograph the two characters in front of a solid background, not in front of the car. Then take a background photo (using the same technique here) of the car without the people. Then have your designer photoshop them together later. I would even go a step further and take a picture of the car without its background, and then take the trees as a separate photo. You never know how the composition will work best with your title treatment, or in different orientations (have a look at key art that is modified for a landscape orientation in iTunes trailer art…you’ll want to be able to move things around to create the look you want in the space that is allotted).
The point is that you are producing elements, not photos. Therefore, don’t just do this type of work for your actors/characters. Do it for your locations as well. You never know what background you may want to use, and the more shots you take, the more options you will have.
Of course, all this requires thinking ahead. But you will be glad you did.
Found this post informative? Check out David’s advice on Developing Key Art as your film enters the festival circuit.
David Averbach December 21st, 2012
Tags: film marketing, film posters, graphic design, key art, Photoshop, set photography, The Film Collaborative, unit publicist
Rethinking Your Key Art Game Plan, Part 1
Over the next several weeks, The Film Collaborative’s Creative Director, David Averbach, who has worked with dozens of TFC Clients and other filmmakers to help them create and refine their key art, will talk about ways you can avoid the problem of finding out all too late that you don’t actually have the proper materials to produce the key art you want to make.
Note: This Key Art series is intended for micro-budget filmmakers whose crew is not under a union contract. If your film’s crew is under an IATSE contract, you will need to abide by the rules regarding still photographers on set as forth by the union. We have been advised that there may be penalties involved by bringing an intern or PA in to shoot stills.
See Part II HERE
Takeaway: For narrative feature films, understanding the technical aspects of producing key art and thinking ahead to your key art while on your film set can save time, money and a heck of a lot of aggravation down the line.
If I had a nickel for every narrative feature filmmaker who has told me that they got a photographer, professional or otherwise, to come to their film set and shoot photos but in the end they didn’t show up or didn’t do a good job, or was only there for one day out of a sixteen day shoot, and therefore there was nothing to show for that effort in terms of producing images that could be incorporated into a poster, and therefore were only really left with the prospect of using frame grabs from their film, I’d be rich I could probably buy a Starbuck’s gift card that would last me a week or two.
I hope this series of posts can offer some helpful suggestions for you to avoid this situation for your next film.
First let me say that while I design movie posters, I don’t really have a background in filmmaking itself. If there is anything incorrect/inaccurate, generally unfeasible included here, or if you have anything you think I should add, please feel free to let me know. That said, it’s clear to me that in the heat of the film shoot, filmmakers often forget to think about or are so focused on the film shoot that they can’t get around to thinking about the art they might need to support a variety of possible marketing ideas and concepts, and are therefore down the road left with fewer choices and placed in an ultimately weaker position vis à vis possible options on how to market their film or sell it to a potential buyer without an expensive and inconvenient reshoot. (I’m working under the assumption that you are the type of filmmaker who has neither endless funds for a photo shoot 6 months after your shoot ends nor the energy to pull in yet another favor from some photographer you or one of your colleagues may have worked with in the past.)
There are two parts to tackling this problem. The first has to do with understanding resolution: what you have, what you need and how to bridge the two. The second has to do with beginning to think about your marketing strategy even before your film shoot, and preparing to build the raw materials you would need to execute any number of possible marketing directions.
So let’s talk about resolution first. (I’ll get to marketing strategy in Parts 2 and 3 of this series).
Knowing the resolution of your frame grabs
If you’re lucky enough to work with a 4K or 5K camera, such as a RED camera, meaning that the max output resolution is over 5000 pixels wide (5120×2560 on a RED) (which is about 6.5 times that of 1080p (1920×1080), those will produce beautiful film stills. So if you were to shoot your entire film in 5K, much of this next part won’t apply to you. In the real world, according to my DP friend, most people don’t and can’t afford the drive space and rig to do that in production. So if this is the case the highest output for a film grab might still be 1920×1080.
Now 1080p cameras that have a good quality and large sensor with a full chip (DP friend: preferrably not a 1/3 chip), will produce beautiful images…wonderfully clear, and of course you can blow them up to a certain extent without anyone noticing. But if you want your image to take up most of the width of your poster, you will have a resolution problem. The bottom line is, with 1080p output, if you want a theatrical poster using just a few main images, you won’t be able to really rely on frame grabs alone.
While frame grabs will probably work just fine to produce the key art for a DVD cover or a digital release, they are simply not going to cut it for a one sheet. And even while some films will never end up getting a proper theatrical release, all filmmakers tend to want a theatrical (sized) poster, especially if their film gets into a top-tier film festival.
Why won’t frame grabs work well? Well, Bill Clinton said it best: arithmetic.
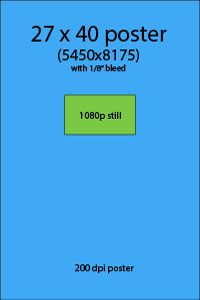
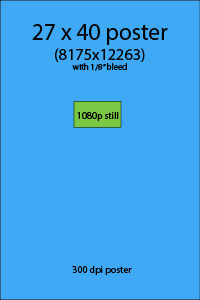
Perhaps not every filmmaker knows how 1080p correlates to print resolution. As I state above, something that is shot in 1080p (16:9 aspect ratio) is 1920×1080 pixels in dimension. How many pixels will you need for a poster? Well, posters are usually 27×40 plus a ¼” bleed, and the minimum resolution is about 200 dpi (or dots per inch). That means that a poster needs to be at least 5500 pixels wide and that a frame grab would be up-res’d be almost a factor of 3 in order for it to stretch horizontally on a one sheet to even get up to 200dpi.
 |
 |
Until all cameras are 5K resolution and one can easily shoot their whole film this way, part of the collateral damage from the transition to digital is that this is yet one more thing that a filmmaker has to think about…in the days of 35mm, it was common practice to pick a frame of the film and scan it into a large still for use in a poster, but if the maximum output or effective maximum output from your camera is 1080p, you don’t have that luxury.
The end result will produce a blurry image at best and a pixelated image at worst. While this might be good for a background image, if you would like to use a close-up of someone’s face or a full body shot, this is just not going to look good.
Now that we’ve agreed that we need still photographs, what steps can you take to ensure that you will get something that you can use, both in terms of quality and content?
How to make sure you have images for key art—no matter what your budget
You are shooting with a great camera that can take great stills. But what if you can’t spare the time to use the camera you’re shooting on to also do stills?
On to Plan B. Hire a professional photographer, or at least someone with a really nice camera. In an ideal situation, you would get another 5D to take stills to complement the main motion picture camera. (Per my DP friend…Snug up to the lens…use Zeiss prime lenses for sharness or Canon L series lenses if going for more of a softer thing. If you can’t do that with your budget, use a monopod and critically check focus). This is great advice. If you have the budget for it.
But creating images for a poster is more than just producing nice photos. Shadowing the film shoot with a still camera often produces shots that are great for press stills, but may not be all that useful for a poster. Of course it depends on what kind of poster you will want to make. But in the end, it’s good to have a Plan C, and not in the sense that you need a third option because the first two didn’t work. I mean a concurrent Plan C.
This is it: Think of shots for key art as publicity shots, not as enlarged film stills. (And by “publicity shots,” I don’t mean for the actors, I mean publicity shots for the characters, so make sure they stay in character while you shoot them.) It’s fine to do what my DP friend says, but you need to do more. There’s lots of down time on a shoot. Actors are present and in costume and makeup. Move away from the action of the film. Use that hired photographer. Or use hire an intern with a good eye. Use that second 5K camera. Or get an inexpensive 16 megapixel camera. It doesn’t really matter. Just do it. Start outside around lunchtime, when the light is best. Find a white wall, or hang up a sheet outside somewhere. Think about what kind of poster you’d want to make. Develop half a dozen concepts (more on this in parts 2 & 3). Take it seriously. Start shooting.
What you should be creating here is this: Hi-res Scraps. You don’t know how you will use them, but at least you will have something.
Don’t have the budget for a second 5K camera? Fine. But we’ve gotten to a point where consumer cameras can actually produce extremely high quality and high resolution images. Last year, I bought this point-and-shoot camera on Amazon. It’s 16.1 megapixels. It lists right now at $150, but I think I bought it for $109 at one of those after Christmas sales. Every filmmaker has the budget for this much. You’ll be paying a lot more to correct this down the road if you feel this will put your budget over the edge.
See how much more you can get in terms of resolution when using a 16 megapixel camera as compared to a frame grab?
Is this a crappy camera? Compared to the ones you are using to film your shoot, absolutely. But graphic designers have their bag of tricks. Perhaps you’ve heard of Photoshop? We can make even images from these cameras look great. If the right shots are taken. So now there is no excuse to come back from a film shoot empty handed in terms of images for your key art… It is like buying key art insurance: you may not need to use it, but in a pinch you’ll be glad you have it.
Next week, in Part Two, I’ll give you some examples of a few concepts every film should have their “key art still person” shoot.
David Averbach December 12th, 2012
Tags: film marketing, film shoots, images, independent film, key art, One Sheets, Photograhers, posters, resolution, stills
Building Great Partnerships: What 10×10 and Half the Sky Did Right
a guest post by Allie Hoffman of Picture Motion
Two of this years’ biggest film + social action campaigns focused on women’s issues: Half the Sky* and 10×10 (now retitled, ‘Girl Rising’)*. Both campaigns were conceptualized by media professionals with established reputations; Nick Kristof and Sheryl Wu Dunn launched the movement with their best-selling book; prior to that, Mr Kristof was a 2-time Pulitzer Prize winning NYT columnist. Kristof’s network of leaders – non-profit, country, international NGOs, celebs and change makers – is (likely) one of the largest.

The 10×10 campaign began at the Documentary Group, an offshoot of Peter Jennings’ production company. The Emmy-award winning leadership team had worked for decades within the world of broadcast media, which endowed the project with a devoted network of media, corporate and non-profit contacts.Both projects leveraged their contacts expertly. While we recognize these examples are extraordinary – and most independent documentary filmmakers are significantly less networked – both campaigns evidence the power of a diversified partnership strategy.
The table below dissects these partnerships across 6 categories:
| Corporate | Govt / Federal Funds | Private Foundations | UN Agencies | Intl NGOs | Local NGOs | |
| 10×10 | Intel, google | Vulcan | UN Foundation (GirlUp) | Plan, Global Campaign for Education, Room to Read | Afghan Connection, A New Day Cambodia, Pratham, | |
| Half the Sky | Ikea, Coca Cola, Vagisil, Goldman Sachs, Nike | USAID, National Endowment for the Arts | Ford, MacArthur, Gates, Rockefeller | UN Foundation | World Vision, Save the Children, CARE | Nearly 30: Examples inc Edna Adan Maternity Hospital, GEMS, Umoja Womens’ Village |
By targeting many different types of organizations – and creating numerous partnerships within each category – the campaigns were exponentially strengthened.
Getting organizations on board to engage in meaningful partnership with your film can be an epic challenge; the large ones are slow moving, and the small ones are limited in their scope. All this being true, progress can be expedited by employing these tactics:
– Research. Understand the organization’s program areas and its communications infrastructure. Conduct extensive research on relevant, direct contacts. Gather all the info in a spreadsheet. We often find the following helpful:
- Take a quick glance at any non-profit’s IRS 990 forms to understand size and financial resources
- Review the facebook page to understand their digital engagement capacity
- Download Annual Reports to glance programs, and leadership
- Pull press releases for direct contact info, if you cant find it anywhere else – its almost always there!
– Create goals. Create a list of possible areas for collaboration, with the greatest opportunities for the film at the top. Think BIG.
Consider your timing; often organizations are slow-moving when it comes to establishing partnerships like this, and it can take weeks – if not months – to see results. As such, try to avoid approaching potential partners 2 weeks before your launch/premiere, etc. Make it clear to them they’re an integral part of your campaign by approaching them 6-8 weeks before any campaign milestones.
–Align interests + communicate your goals. Clearly communicate how the partnership will help you meet your campaign goals, what you need from the partner, and how it’s in their interest to partner with you. Articulate all the ways the partner organization might benefit. Be willing to compromise. Log all these ideas into your spreadsheet.
–Make it official. As much as possible, create a simple agreement that outlines what the organization has said they would do, and what your team has committed to doing. Log all these commitments into your spreadsheet.
–Track results. Every mention in newsletters, on facebook pages, every time the organization hosts a screening – log it in your spreadsheet. Also record the number of people within the organization’s communications network. In other words, how many people received that newsletter? How many facebook likes? How many people at the screening? All this information quantifies your campaign’s reach, and overall impression.
Learn more
Other film campaigns that created issue-specific, numerous, dynamic and engaged partnerships:
www.takepart.com/foodinc/action
We look forward to feedback below. Email me at allie@picturemotion.com with any direct inquiries.
About the Author
Allie Hoffman is Director of Communications at Picture Motion, where she manages partnership development for the agency’s film + social action campaigns. Current projects include Beauty is Embarrassing and First Generation.
*editors notes
Half the Sky is a landmark transmedia project featuring a four-hour PBS primetime national and international broadcast event, a Facebook-hosted social action game, mobile games, two websites, educational video modules with companion text, a social media campaign supporting over 30 partner NGOs, and an impact assessment plan all inspired by Half the Sky: Turning Oppression into Opportunity for Women Worldwide, the widely acclaimed book by Nicholas Kristof and Sheryl WuDunn.
Girl Rising is the feature-length film at the center of 10×10’s global action campaign for girls’ education. The film reveals the extraordinary stories of girls from around the globe, fighting to overcome impossible odds on the road to realizing their dreams of education. Directed by Academy Award nominated documentary director Richard E. Robbins, Girl Rising tells the stories of 10 girls from 10 countries, selected in consultation with 10 acclaimed women writers, working closely with non-profit partners.
Orly Ravid December 5th, 2012
Posted In: Community partnership, education, Marketing
Tags: 10x10, Allie Hoffman, Community partnership for films, Documentary Group, Girl Rising, Half the Sky, Nick Kristoff, Peter Jennings, Picture Motion, Sheryl Wu Dunn, social action, women't issues